Spread Some Holiday Love with Popcorn Balls!

Get out your dental floss folks because we are making popcorn balls!

I had the semi-genius idea to make a popcorn ball Christmas tree while half asleep/half awake one lazy morning.  It felt brilliant, like the kind of recipe where I needed to run to town immediately and gather all items necessary.

After growing up in the carnival and having an aunt that gave us popcorn balls for every occasion, they are a celebratory staple in my kitchen.

The sticky, gooey, goodness pre-form.

Do you remember me telling you about how it’s okay to make mistakes and try things out in the kitchen?  Yeah, well this recipe is one of those times.  Once the popcorn ball Christmas tree was assembled it looked like something a 3rd grader made.  Kind of embarrassing actually.  And as my friend and sous-chef for the project Marie so aptly stated, “We’re sober even.” Sigh……

The decorum assembly line.

As I gazed upon the popcorn monstrosity I thought “There is no way on this planet I will post a picture of something so ugly.”  But then I thought, “Do it.  I need to be true to the way I live, mistakes and all.”  The idea looked so much more beautiful in my mind.  I had visions of gold dusted and sugar pearl studded popcorn balls, a classy and elegant centerpiece for the most high fashion of Christmas parties.  Alas it was an over sprinkled hot mess!
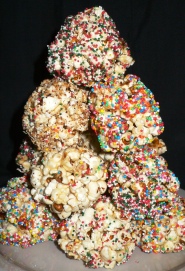
My hideous popcorn ball Christmas tree that looks like a 3rd grader made it. It seemed like a good idea.....

In the end I deconstructed the tree and passed out the popcorn ornaments to my friends and neighbors and they loved them!  So even though it was an aesthetic flop it was a tasty and rewarding success.

Happy holidays to my family and friends at home and abroad.  May your life be filled with love and forgiveness.

Popcorn Ball Christmas Tree

Ingredients

2 cups sugar

1 1/2 cups water

11/2 tablespoon distilled white vinegar

1 tablespoon +1 teaspoon salt

1 teaspoon vanilla extract

1 cup un-popped popcorn

1 ½ tablespoons virgin coconut oil

Colorful decorations such as: colored sugar crystal sprinkles, edible gold dust, sugar pearls, toasted coconut etc.

Yield 13-15 tennis ball sized balls

Directions

Add coconut oil to a large pot and heat over medium high heat, pop covered until all kernels are popped, add 1 tablespoon of salt and shake to combine.  If you would like you can use microwave popcorn or an air popper according to its directions.  I have neither luxury so old fashioned popping it is.

In a medium sauce pan combine the sugar, water, 1 teaspoon salt and vinegar. Cook over medium heat to the hard ball stage 250 degrees F (120 degrees C)using a candy thermometer (good luck find one of those in Fiji). Or simmer uncovered for about 25-28 minutes until dark amber in color and thickened.  Stir in the vanilla and slowly pour the hot mixture over the popped popcorn, stirring to mix well.

Oil hands lightly and shape into tennis ball sized balls. Mixture will be extremely hot so be careful. Place balls on a large plate or wax paper to cool.

Place your decorations in shallow dishes and roll balls into decoration.  If you are using edible gold dust use a small, clean paint brush to paint each one or if using the sugar pearls you will need to place them one at a time. To make the tree look less busy leave some balls undecorated.  Chill decorated popcorn balls in the refrigerator for 30 minutes before assembling the tree.

Arrange balls in a circle and then build your next layer on top and so forth until you have 1 at the top.  As a suggestion you may build the tree on a cake stand to be used as an edible centerpiece(if it looks better than mine did!). Allow your guests to take one popcorn ball home or eat it at the party!

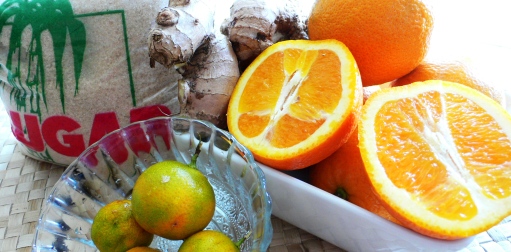
Sick of packed parking lots and crowded malls? Head to your kitchen instead! Try this Ginger Orange Marmalade recipe on for size.

I wanted to give a few of my Peace Corps volunteer friends a little holiday treat for being the awesome women they are so I was perusing one of my fave food sites, the Whole Foods Market online recipes (see blogroll link on right).

Having limited access to many foods, I needed to choose wisely.  And as my volunteer budget is fiscally slim the recipe needed to go far on a wafer thin dime.  Ginger Orange Marmalade fit the bill perfectly.  You might be tisking me right now & shaking your head thinking “Wait a minute. You said you only buy local and aren’t those oranges you are buying coming from New Zealand?”  Umm, well, yeah…. I’m busted.  Perhaps a minute food hypocrisy, but for the sake of a tasty gift, I sacrificed my morals.  Everything else was local and the jars were recycled….so I justified it.

The goodness!

I followed the recipe to the letter and found that the concoction needed to boil for just shy of an hour to thicken properly.  It only filled three 8oz. jam jars, which is 1 shy of the promised yield.  To the recipe’s defense the oranges I used were fairly small, but I did use 5 instead of 4.  I also felt it could have used more ginger.  The orange is so pungent and pronounced the ginger loses its pull, however my tongue did catch a few heated ginger bites.  I would suggest at least another ½ tbsp to pump it up. Nevertheless, the final product as a gift is gorgeous especially with some nice fabric or ribbon used to embellish.

The taste you ask? Marmalade is always bitter-sweet, there is no way around it and if two cups of sugar isn’t good enough then I don’t know what is.  But, this golden-hued gift was as bright in its flavor as your twinkling Christmas lights.

I had the idea to add a cinnamon stick in the pot but didn’t, I kind of wish I had.  Adding some spice would crank up the “holiday” factor.  A cinnamon stick, one star anise or a few cloves thrown in would have intensified the flavors.  Next time I am going to do just that.

One suggestion though, don’t serve it on burnt toast like I did.  Whoops! That’s what I get for cooking and blogging at the same time….

The gift of food = love!

Thank you Whole Foods Market Online!

Ginger Orange Marmalade

Ingredients

4 navel oranges (8 to 9 ounces each), scrubbed and rinsed
1 quart water
2 cups sugar
1/4 cup lemon juice
2 tablespoons grated fresh ginger (I’d use 2 ½ tbsp)
1/8 teaspoon fine sea salt

My 2 cents:

Add 1 cinnamon stick, 1 star anise and 3 cloves to the pot.  Remove before placing in the jars to cool.

Method

Chill a small plate in the freezer for 30 minutes. Meanwhile, trim off and discard the ends from the oranges. Using a sharp paring knife, carefully remove the peel and pith from all of the oranges. Slice half of the peel (with pith attached) into very thin, bite-size strips and transfer to a large pot; discard remaining peel and pith. Thickly slice all of the oranges, discard any seeds and cut flesh into small pieces; transfer to pot with peel and pith. Add water, sugar, lemon juice, ginger and salt and bring to a rolling boil. Reduce heat to medium high and boil, skimming off and discarding any foam on the surface and stirring occasionally, until very thick, about 45 minutes.

To test the marmalade for doneness, drop a teaspoonful onto the chilled plate, wait five seconds, and then run your finger through the center of the marmalade. When it’s thick enough, the trace of your finger should remain clear. If the marmalade runs back together, return the pot to the stove and the plate to the freezer and check again in a few minutes.

Ladle hot marmalade into jars, seal tightly, set aside until room temperature and then chill in the refrigerator for up to 2 weeks.

Nutrition Facts

Per serving (about 2 tablespoons): 40 calories (0 from fat), 0g total fat, 0g saturated fat, 0mg cholesterol, 20mg sodium, 11g total carbohydrate (0g dietary fiber, 11g sugar), 0g protein

My First Post! Pan Seared White Fish with Mango Mint Chutney

This blog is meant to express my love and adventurous sense of all things related to food.  It will follow me as I move and play in different parts of the world.  It will be an eclectic expression of what I’m craving and what’s local and in season.

Currently I am a Peace Corps volunteer living in Fiji.  I have a small, modestly appointed flat with no fancy gadgets or measuring tools in my kitchen. With lack of microwave, toaster, oven, blender or other such developed-world devices it’s just me and my imagination.

The modestly appointed Fiji-kitchen.

I have been running in the whole-food, clean-eating, organic scene since 2001 and now it’s time to share the love.  This blog will hold info and recipes that are

  1. Health conscious! ( I know that’s a relative term…you’ll see ; )
  2. Clean – meaning no additives, dyes, boxed cake mixes, trans-fats (ewww)
  3. An expression of my environment…meaning local and seasonal….unless you want to cough up $6 for a shriveled, mediocre flavored plum from New Zealand I’m sticking to what’s around me.
  4. Mostly gluten and dairy free…yup, I’m one of those…
  5. Playful experimentation.  It’s not just eating to survive; it’s about all facets of the eating experience – tastes, smells, sounds, colors, textures.
  6. Willingness to make big mistakes in the kitchen….really who cares!!   It’s not always going to be Food Network perfection.  For example, yesterday, I lit my plastic spoon on fire and half melted it.  Oops.  It’s so much more fun when you allow yourself the freedom to make mistakes!!

So here goes….my first recipe post….Ditch your fork and start eating with your hands. Cheers!

I went to my fish market and purchased a line caught trevally.  It is a hearty, white fleshed fish that is a member of the Jack family.  Honestly, it would not have been my first choice, but it looked good and the price was right.  I let go of my plan and went with what Mother Nature was providing instead.

I quickly gathered the rest of the provisions for the mango mint chutney, hustled to the bus stand and shimmied through the door of my bus as it was pulling away barely slowing for my boarding.

The before.

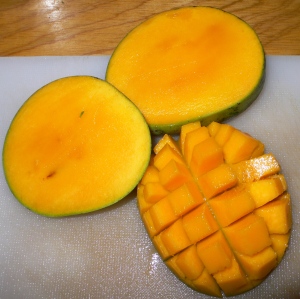
I cleaned the fish, brushed off the errant fish scales from my clothes and moved onto the chutney.  Cutting mangos can prove to be challenging because of the large pit inside so below is a photo of the way that I was taught.  The step-by-step instructions are in the recipe directions.

The easiest way to cut the mango.

The finished product for this meal was vibrant in its flavors, smooth in its textures and gratifying in its portions and health benefits.

My suggestion is to serve this with brown jasmine rice as its fragrant nature pairs excellent with the perfumed quality of the mango.  There is plenty of mango chutney left over so you may enjoy polishing it off with some spicy blue corn tortilla chips.

The final product.

Pan Seared White Fish with Mango Mint Chutney

Mango Mint Chutney:

2 ripe mangoes (about 1 cup), diced

1 green onion, sliced thin

2 tbsp mint, chopped fine

1 tsp cilantro, chopped fine

1 chili, minced (optional if you don’t like spicy)

pinch sea salt

Fish:

2 fillets white fish

sea salt

pepper

1 tsp toasted ground cumin

1 tbsp extra virgin olive oil

1 tbsp butter

2 lime wedges

 Cut the cheeks off of the mango and make checkerboard like scored cuts to the skin but not through it.  Turn the skin inside out and gently run the knife along the skin and remove the cut mango pieces.  Add the rest of the ingredients, stir and let sit unrefrigerated while you prepare the fish.

Heat the butter and oil in a large skillet over medium-high heat.  Sprinkle fish with salt, pepper and toasted cumin on both sides.  Place fish in skillet skin side up on medium-high heat. Cook for 4 minutes, flip and cook for another 2-4 minutes depending on the thickness.  Spoon 2 tbsp of mango mint chutney over fish and serve with lime wedges.